Showing posts with label kid stuff. Show all posts

Saturday, July 4, 2009

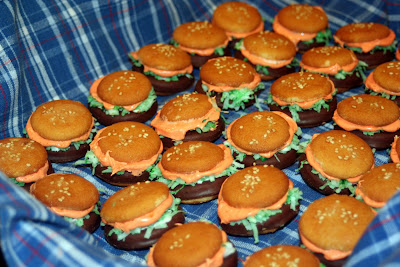
Mini Hamburger (cookies)


We've been busily celebrating our Independence with good friends, good food and great fireworks... more will be posted about that later... But I had to share these adorable little hamburger cookies! Just too cute not to share. Excuse the photo quality. I am going to make these tonight to bring to another 4th party this evening.
How to make Hamburger Cookies
You will need:

Sesame seeds
Nilla wafers
Keebler Grasshopper cookies, or Girl Scout Thin Mints
Canned frostingFood coloring, red, yellow, green
Shredded coconut
In a small plastic bag add shredded coconut and green food coloring, shake until you get the color you desire to resemble shredded lettuce.

In a small bowl, mixing frosting and food coloring together until you reach the color of "special sauce" or cheese -- start out with small amounts of red and yellow to achieve a pastel orange color.
Take one Nilla wafer, apply a small amount of frosting to use as a glue, place the mint cookie on the Nilla wafer, then add small amount of frosting once again to be used as glue, top that with the lettuce, then a generous amount of "special sauce/cheese frosting" before adding thebun (Nilla Wafer) on top of that.
To get the sesame seeds to stick on to the bun, use an egg wash. Apply *egg wash on to the Nilla wafer then add sesame seeds and voila!
To make an egg wash use egg white, egg yolk or whole egg and 1 tbs. of water or milk. Mix well
and brush on to surface.

I am going to buy some little American Flags and stick them in the middle of my burgers!

Friday, November 7, 2008

Pilgrim Hat Cookies


I think I first saw these in Family Fun magazine eons ago when Rebecca was in preschool. I have made these fun cookies every Thanksgiving holiday for 5 years now. Older kids can help, but the smaller ones are better off watching as this can get messy!
Ingredients

1 package chocolate chips (I am partial to the yellow package we all know and love!)

1 package Keebler Fudge Stripe cookies (the round ones)

1 package large marshmallows

1 skewer or stick (to dip marshmallows in melted chocolate)

1 squeeze tube of yellow frosting, or prepared yellow frosting in pastry bag

Directions:

Start by melting your chocolate over medium heat in a double boiler.

If you do not have a double boiler you can create one quite easily. Place a medium or large glass or metal mixing bowl in a medium or large saucepan filled halfway with water. (Place the chocolate chips in the bowl)

Stir until melted and reduce the heat to low.

Clear off a large section of your counter top and place some parchment paper or wax paper on a cookie sheet.

Open your marshmallow and cookie packages... place several cookies on a cookie sheet and keep several marshmallows at hand.

Using your stick or skewer dip the marshmallow in to the melted chocolate and make sure that the marshmallow is completely covered. (You may want to use a small knife to help guide the chocolate on and wipe any excess off

Once your marshmallow is fully covered place it on the cookie, chocolate side UP threading the skewer through the hole in the center of the cookie. Carefully set on the cookie sheet and repeat until the sheet is filled.

Place cookie sheet in fridge or freezer so that cookies harden. Repeat until desired amount of hat cookies are made

Once all cookies have set and hardened, pipe a small square in the middle of the base of the marshmallow so that it resembles a small belt buckle. Place on serving platter or dish when ready

Thursday, October 30, 2008

Cobweb Cookies


I'm going to An Old Fashioned Halloween Party today. I am trying to decide that to make/bring. I made these for another event last week and do not want to duplicate myself. These were a huge hit, however!
The best part is that you don't have to make anything from scratch. (If you don't want to!)


You'll need:
1 package small black spiders (use larger ones if you are making these for the younger set)

2 rolls of Pillsbury or Nestle's refrigerated sugar cookie dough

2 - 4 Tbs. of milk

1 can of vanilla frosting*

1 can of chocolate frosting

1 or 2 disposable pastry bags with a thin tip

Bake cookies per directions on package, cool and frost with vanilla frosting, let harden over night or for a few hours


Add milk to chocolate frosting to make it softer and place the frosting in the disposable pastry bag.


Roll or pinch the top of the pasty bag.

Pipe frosting in circles, then pipe the stripes going across the cookies.

Place spider on top (to hide any flaws!)


* I made the frosting following the recipe on the back of the Domino's confectioner's sugar packaging. I love the way it tastes! Kids can help with this one too!


Wednesday, September 24, 2008

F is for Fire Truck Cookie


Alexander went on his first class field trip today. The Pre-K 3 class went to a fire station near the school. The kids had a blast learning all about the fire men and what they do. They got to sit in the front of the fire engine (if they wanted to do so) and got to hold the hose as it sprayed water! When the adventure at the fire house was over the kids all made their way to the play ground across the street where they all prepared their snacks... fire engine cookies of course!

Each child got one and a half graham crackers, a plastic knife, 4 mini Oreos, a few mini pretzel sticks, 1 string of red licorice and one Dot candy.

First they "painted" their fire trucks red by spreading frosting on the larger graham cracker, then over the smaller graham square. The smaller square was placed over the longer rectangle piece. The kids then added their wheels (Oreos), ladders (pretzels), hose (licorice) and siren (Dot candy)

By prepackaging the ingredients into individual Ziploc bags the children had everything they needed at their fingertips. This alleviated any potential chaos. The children needed only slight guidance.

For mothers of children who love anything fire engine-related this is a wonderful craft. I would think this would go over well on a play date after reading any of the many wonderful fire engine books out there!


Tuesday, September 9, 2008

Alexander's "Blue Flower Cupcake"


I always make cupcakes for the kids class parties. I try to make them each a little different. But this year, Alexander would not have it that way. He insisted on the flower cupcakes I made his siblings last winter. Poor kid has been waiting almost 9 months to have these cupcakes "with the lollipops and the worms!" The only difference is that I had to use the Blue's Clues cupcake papers. So these are Blue's Flower Cupcakes. And they are a little different.


Ingredients:

1 box yellow cake mix
add 1 cup of vanilla yogurt
1 package of vanilla pudding mix
1 container white frosting (chocolate is OK too)
green food coloring (if using white frosting)
green sprinkles (or chocolate if using chocolate frosting)
DumDum lollipops (or any kind you please)
gummy worms

Preheat oven to 350 degrees

1. Follow directions on the back of the cake mix and add the yogurt and pudding mix. Mix well.

2. Pour into lined muffin tins and bake per directions on package plus 3 -5 extra minutes.

Meanwhile:

Mix the desired amount of food coloring and frosting to acheive desired color, set asside.
3. Remove from oven and let cool.
4. Once cooled spread desired amount of frosting on each lollipop and add sprinkles. Place a lollipop in the center of each cupcake and a gummy worm someplace near the flower.

Makes about 18 cupcakes


Friday, August 22, 2008

I can'tstopeatingthisAMAZING Granola!


I like granola, granola bars and oatmeal raisin cookies, especially the thick chewy kind you get in a bakery. My mother had a recipe for it that I liked as a kid. Of course I can never leave well enough alone and decided to doctor it up a little and what resulted was a crunchy, chewy, sweet treat I can not (nor can anyone else around here!) stop eating!

I made this for my breakfast fussy daughter as well as the boys who love cereal. This is fabulous sprinkled over vanilla ice cream or stirred in to some vanilla yogurt. Personally, I think it is perfect plain, all by itself! Although quite high in sugar, (I use honey as well as brown sugar in this variety) this recipe has a lot of wonderful nutrients from the oats, dried fruit and flax seed.


Preheat oven to 275

Ingredients:

26 oz. oats, uncooked, NOT quick cooking

1/3 Cup flax seeds (whole seed)

2/3 Cup sliced almonds -- optional and other nuts may be substituted

1/3 Cup sunflower seeds

1 Tsp. Pumpkin Pie Spices

1/2 Cup Canola oil

1/2 Cup dark brown sugar

1/2 Cup honey

2 cups of dried fruit such as raisins, dried cranberries... you can mix different fruits

Place all dry ingredients in a large mixing bowl, add honey, brown sugar, spices and oil and mix really well. (This is great fun for the kids to do and, provided they have washed their hands really well can mix with their bare hands!)

When all is well mixed placed in a parchment lined rimmed cookie sheet or Jelly Roll pan and spread out evenly. (A non-stick cooking spray may be used instead of the parchment paper.)

Bake for 1 hour

Let cool about 20 minutes, then break up and crumble into bite sized pieces, add fruit toss... enjoy right out of the bowl!

Thursday, August 14, 2008

Spaghetti and Meatballs


My kids love to cook and I try to have them attempt a new recipe on their own. My 7 year old made these the other night and they were fabulous! This recipe is loosely based on a recipe I found in Everyday Food (April 2004, page 68)


Martha says "If you have the time, chill the meatballs for thirty minutes before cooking them. This will help them keep their shape and make them easier to handle."


Ingredients:
1large egg
coarse salt and ground pepper
1 large onion, finely chopped
6 garlic cloves, minced
1/2 cup dried bread crumbs
3/4 cup finely grated Parmesan cheese, plus more for serving
8 oz. ground pork
8 oz dark meat ground turkey
*(I used a 93% lean ground beef instead of the pork and turkey)
1 teaspoon Italian seasonings
2 Tbs. olive oil
1 can 28 oz. crushed tomatoes
*(I used a jar of premium organic arabiata pasta sauce)
3/4 lb spaghetti

1. In a large bowl whisk together egg, water, salt and pepper. Stir in 1/2 onion and 3 cloves garlic. Add cheese, breadcrumbs and ground meat. Add 1/2 the Italian seasoning. Mix well and form into balls.

2. Heat 1 tbs. olive oil in a large non-stick skillet over medium high heat. Add meatballs (do not place to closely to one another) and brown on all sides. (About 4 to 6 minutes) Repeat with remaining meatballs. Remove meatballs when done.

3. Add remaining onion, cook over medium-low until soft, about 5 minutes. Add remaining garlic and Italian seasonings cook 30 seconds. Season with salt and pepper. Stir in tomatoes and 3/4 cup of water. Return meatballs, cover and simmer until fully cooked, about 20 minutes, Remove balls. * Instead I added meatballs to the simmering organic arabiata pasta sauce for 30 minutes.

4. Meanwhile, cook pasta in a large pot of boiling salted water -- according to directions on package. Drain return to pot. Toss with sauce and serve meatballs on top. Sprinkle with more cheese if desired.

The Best Blueberry Muffins


It's blueberry season and we are baking with them almost daily. I made these muffins the other day and they really are divine. I have made many many blueberry muffins over the years. I keep coming back to this recipe though. It really is the best. The recipe originates from Elizabeth Alston's Muffins, Sixty Sweet and Savory Recipes... From Old Favorites to New.


"Bursting with berries, these are the best blueberry muffins of all. The secret is an extra half cup of blueberries, which are mashed and then added to the batter."


1 stick butter, room temperature
1 cup granulated sugar, or slightly less
2 large eggs
1 Tsp. vanilla extract
2 Tsp. baking powder
1/4 Tsp salt
2 1/2 cups of blueberries (mash 1/2 with a fork)
2 cups all purpose flour
1/2 cup of milk
1 tablespoon sugar mixed with 1/4 tsp. nutmeg (I omit this)


Heat oven to 350. Grease 12 regular muffin cups, or use foil baking cups.
In a medium bowl beat butter until creamy
Beat in sugar until pale and fluffy
Beat in eggs, one at a time
Beat in vanilla, baking powder and salt
Mash berries in to batter
Fold in half the flour with a spatula, then half the milk. Add the remaining flour and milk. Add in remaining blueberries.
Scoop batter into muffin cups. Sprinkle with nutmeg sugar.
Bake 25 - 30 minutes or until golden brown.
Let muffins cool for 30 minutes before serving.

Sunday, June 22, 2008

Sunday, April 20, 2008

Banana Chocolate Chip Oatmeal Muffins


These muffins have all the chocolaty goodness you need when you crave something sweet and yet, despite the decadent chocolate they are healthy and low in fat!


Preheat oven to 350 degrees

Makes 16 muffins

Line muffin/cupcake tins with liners, if desired or spray with a non-stick cooking spray.


Ingredients:

2 very ripe bananas
1 1/2 cups of all purpose flour
3/4 cups of sugar
1/8 tsp. salt
1 tsp. vanilla
1 egg
1/3 cup low-fat or no-fat sour cream
1/4 cup plus 2 Tbs. of fat free or 1% milk
1/3 cup canola oil
1 1/2 tsp baking powder
1/2 cup of slow cooking oats
1 cup semi sweet chocolate chip morsels


In a large bowl mash the bananas and add sugar, egg, and vanilla. Mix well. Add milk, sour cream, oil and egg, mix well
Slowly add flour, salt and baking powder, mix well
Add oats and chocolate chips


Using a spoon or small ice cream/cookie scoop fill the muffin cups 3/4 to the top.


Bake for 25 minutes or until inserted toothpick comes out clean.

Friday, February 22, 2008

Christopher's Miniature Flower Garden Cup Cakes

sorry the pictures are not so great... but you get the idea!


I made these cupcakes for Rebecca's class party and Christopher loved them so much he asked that I make them for his class party yesterday. I love that they are quick and easy to make. With so much on my plate these days I just don't have time for intricate baking/decorating projects, so I was thrilled when he asked me to replicate Rebecca's cupcakes.

Yields 24

If you would like to try your hand at these you will need:

1 box of yellow cupcake mix (unless you have a little chocolaholic on your hands!) If you would like your cupcakes slightly larger use two boxes and then pour remaining batter in to a loaf pan, bake and freeze for future consumption.

1 container of vanilla icing
1 container of chocolate icing
1 container of cupcake liners
1 or 2 packages of lollipops, preferably with pastel colors -- Charms and Dum Dums work well too, but Tootsie Pops and Blow Pops are too top heavy
1 or 2 packages of gummi worms
1 med. container or chocolate sprinkles, unless you are from Massachussets and then you will want Jimmies!
1 med. container of bright green decorating sugars

Optional, 1 box of green roll-ups or fruit leather, to cut into leaf shapes -- I did this for Rebecca's but forgot to pick some up for Christopher's. He did not care but I loved the look of the little green leaves at the base of the lollipop flowers! And unfortunately I never took a picture of Rebecca's... Oh well...


*Bake the cupcakes as indicated on the box, let cool for a good hour
*Frost half with chocolate frosting and half with the vanilla
*Into two separate bowls pour the green and chocolate sprinkles
*Dip the vanilla frosted cupcakes into the green sprinkles -- make sure the entire top is covered
*Repeat above with chocolate frosting and chocolate sprinkles
*In the middle of each cupcake insert your lollipop and if you would like to cut out the leaf form and place at the bottom
*Place your worms on top of your cupcakes, or with a knife, create a slit so that it appears as though the worm is crawling out of the cupcake
*Let dry -- overnight if possible -- before transporting cupcakes

Sunday, February 10, 2008

Fluffernutter Sandwich


Sometimes you want to be a fun mom and throw everything involving good food and nutrition to the wayside! Nothing says Yum and Fun like a Fluffernutter sandwich! But your kids can have this and still have a fairly healthy treat. Shhh, don't tell them though! My kids were brought up on whole wheat bread and as a result do not care for the soft white kind that gets all stuck in your teeth (thank God!) so using a good 100% whole wheat bread. I like Peppridge Farm 100% whole wheat as it has no high fructose corn syrup and many other whole wheat breads do, and Skippy Natural (as opposed to regular Skippy) contains no hydrgenated oil. Fluff isn't too terrible, just plain ol' corn syrup, sugar, dried egg white and vanillin. Not sure what that last ingredient is, but it must be related to vanilla. This isn't a sugar-free snack, that's for sure, but let me tell you, I would rather my kids gobble up one of these than a bologna sandwich -- Let's not go there!


For more information on these products go to http://www.marshmallowfluff.com/ and http://www.peanutbutter.com/


Thursday, January 31, 2008

Savory Baked "Fried" Chicken

I haven't been inspired to cook a complex meal lately as I have been doing the Single Parent thing all week. This recipe came to us from my son's friend, Ben. This is Ben's meal to make for his family. My kids love to make this as well. Whether you have children or not, here is a very tasty, easy chicken dish that can be prepared in a flash requiring very few ingients. Hey, Rachael, watch out! Here's our Thirty Minute Meal! And yes, you will say YUM-O!

What you'll need:

1 package of pre-cut chicken strips
1 bottle of a good Ranch dressing (We use a low fat version with excellent results)
1 package of *Panko breadcrumbs
salt, pepper and garlic powder

Preheat oven to 425 degrees

Pour the dressing into a large bowl and place chicken strips -- allow them to sit and marinate for a good 5 minutes or so

Pour the Panko bread crumbs into a shallow bowl of plate

Dredge each strip of chicken in to the breadcrumbs so that each slice is well coated

Place each strip of chicken onto a cookie sheet lined with aluminum foil, if you wish, to save cleaning

sprinkle salt, pepper and garlic powder on the chicken

Bake for 15 minutes, rotate pieces so that both sides get crispy, bake another 15 minutes and serve!

*Panko is a Japanese style breadcrumb. They differ from the Italian version in that they are much coarser and the texture in the end, is lends itself very well to this dish, yielding a much crunchier bite. If you can find the seasoned Panko breadcrumbs I do prefer those, but if not, or if you can not find Panko bread crumbs, the Itailan style will do. Progresso and Ian's both make a Pank style breadcrumb.