Tuesday, July 24, 2012

A simple snack from a summer surplus ...


If you have a vegetable garden you'll understand. If you have a vegetable garden and grow zucchini, you'll very much understand! These summertime veggies can take on a life of their own and take over your vegetable patch! Some people like them raw. My mother slices them and tosses them into her salad. I have to eat my zucchini cooked, preferably grilled. 

A few weeks ago I had Parmesan zucchini fries at one of my favorite restaurants. I wanted to create something like that but healthier. I wanted a Parmesan zucchini fried that wasn't fried. I figured I could easily try to create something similar on my grill pan. And I did. These were simple, delicious and best of all, for me, healthy for the kids and low carb for me!


Ingredients
1 large zucchini
2-3 tbs olive oil
Parmesan for sprinkling

Directions
Slice your zucchini as uniformly as possibly
Rub a very light amount of olive oil on them - enough to prevent from sticking
Place on hot griddle or pan
Sprinkle Parmesan on the side facing up, after a few minutes flip over so that the Parmesan can brown.
Sprinkle Parmesan on the other side, and repeat until both sides are the color you desire. 
(About 3 minutes per side depending on thickness)
Place on paper towel to drain
Serve on a pretty plate

If making for dinner figure 1 large zucchini for 4 people.

Thursday, July 12, 2012

A Midsummer Night's Dream: Cherry Pound Cake...

When life gives you a bowl of cherries you must make this!


Here she is... fresh out of the oven... sprinkled with powdered sugar
because powdered sugar makes everything look prettier!

And because my little fingers couldn't keep to themselves and I had to cover up the little dent I had created... You can't tell anymore, can you??!!


This cake is chock full of moistness... it's rich and dense despite the fact that I had lightened it up some...


Again my little fingers get in the way...
it's hard to shoot a slice of cake when someone keeps nibbling away at it!


I had a bowl of cherries in the fridge. The kids are all gone and they are on the verge of being overripe. Some of them already are. But they are all bursting with flavor and I will never get to the bottom of this bowl. My kids are funny about fruit and the minute it becomes anything less than firm the stuff won't pass their lips. And well, I hate to waste anything so I usually toss my fruit into the freezer for future smoothies, or I toss 'em into a mixing bowl with some butter, sugar, eggs, flower... You get the picture!


And I had a craving for a good cherry pound cake. I searched the web and I found nothing I liked... nothing appealed to me. I remembered this fantabulous Eggnog Pound Cake that I have featured here on my blog and decided to use that as the basis for this recipe. But I felt the need to lighten things up a tad, what with it being summer and all... 


And so I tinkered and toyed, fiddled and faddled and WOWZA... did I ever do good. Now I have to let you in on a little secret. I replaced some of the fat with a cup of cottage cheese. Yes, cottage cheese! Now, don't wrinkle your noses at me. It works. It works well. Trust me here. 
Seriously, this one is to go down in the Pound Cake Hall of Fame. Seriously this is like a Celebration Cake... bring it to a party... butter up your new boss... Trying to score some serious points with the cute brown-haired boy in the cubicle next to yours? Bake his this and he will ask you to marry him right there on the spot! This cake is guaranteed to take you places... trust me!


Equipment
stand mixer with paddle attachment (or hand mixer and large bowl)
12-cup Bundt pan, or tube pan 

Ingredients
2 sticks unsalted butter
3 cups (525 g) granulated sugar
4 eggs
3 cups (339 g) flour
1 tbs vanilla extract
1 cup of low-fat cottage cheese
2 cups of cherries, pitted and cut into small pieces Powdered sugar for sprinkling, optional

Preparation
1. Preheat oven to 325° F/165° C.
2. Cut butter into chunks and cream. Gradually add sugar. Add eggs one at a time then vanilla.
3. Blend well and add the flour. 
4. Stir in the cottage cheese, start on low and then high to break up the curds.
5. Carefully fold in the cherries, mix slowly and thoroughly 

5. Pour into prepared pan and place in the preheated oven. Bake for 90 minutes.
6. Allow to cool 10 minutes in the pan, then turn out onto a wire rack to finish cooling.
7. Sprinkle with powdered sugar and serve. Also good with a scoop of ice cream on the side.


Monday, July 9, 2012

Simple Caesar Salad


Property of The Entertaining House and The Entertaining Kitchen


I'm a salad girl. I love a good salad. They're filling and refreshing, require little prep work and not much required for cleanup either. In fact, in my opinion, the salad is as good as it gets. It's a well rounded, well balanced meal when you add beans, fish, chicken or meat for protein. It's not heavy or filling and nothing beats a summer supper the way salads do. Add a nice crispy baguette, and we are set to go!

I cooked dinner with a friend last night. We made grilled chicken Caesar salad. My friend grilled the chicken and I made the dressing. He was about to use dressing from a jar. Gasp! Can you imagine? I quickly intervened and explained that no Caesar dressing will ever taste as good as one made from scratch. I've tried many over the years and I have finally found one that's a winner every time! And, since I'm always watching my girlish figure these days, I look out for recipes that are not laden with too much fat or too many calories. This recipe calls for mayonnaise, which I prefer as I am leery of feeding my children raw eggs. Also, I use light mayo to lighten it up a tad.

I've adapted this recipe from I don't know where and while I've given proper measurements, as a rule I eyeball everything... last night I added more Worcestershire and some extra cheese... Tear off a few pieces or Romaine and taste as you go along... I'm not really a recipe follower... Recipes, like rules, need to be bent some times!

Caesar Dressing
Ingredients:

3 cloves of garlic, minced - I prefer to mince mine by hand - I find too much of the good stuff gets left behind when you use a garlic press
1 tbs Dijon, heaping - of course
1 tbs Worcestershire sauce - or two!
1 tbs sherry or red wine vinegar -I'm heavy handed here too!
2 tbs mayo
Juice of 1 large lemon
1/2 C olive oil
1/2 Parmesan and more for sprinkling
Freshly ground pepper to taste

Some people like to puree their dressing. Not I! I love the texture that the cheese and the minced garlic give the dressing.

If you have a large jar like an empty mayonnaise or pickle jar use it. 
Into the jar place all your ingredients.
Shake well. Taste...

Wash and clean your Romaine lettuce, place in a large salad bowl and add the dressing. Mix well, taste. If more dressing or more pepper is needed add it now. Add croutons and or freshly grilled chicken or shrimp if desired...

Bon Apetit!

Jessica


Sunday, June 24, 2012

Fusili with Caramelized Onions and Mushrooms


I needed to get something on the table for the children's dinner. I was heading out. I needed something easy. And relatively fast. And something that I could create using the few items I had in my fridge... I am in serious need of groceries! I had this vision of caramelized onions and pasta.

On Thursday evening I went to meet cookbook author Jenny Rosenstrach and listen to her read excerpts from Dinner a Love Story, her newest cookbook based on her website of the same name. (More on that later.) As I was quickly perusing the recipes and listening to her talk the words caramelized onions kept playing in my mind... It just sounded like such a fabulous combination and why hadn't I thought of it. I didn't have the ingredients, whole wheat pasta, spinach, mentioned in her recipe, so I decided to take the onions and go another route... I wasn't exactly sure what that route would be as I grabbed a large Vidalia from the veggie drawer.

Water, in a pot, a box of fusili on the counter, an onion in one hand and a chef's knife in the other... I started to chop, then tossed the small pieces into a pan, a little olive oil, a little butter... and then watched as the butter and oil blended together and the onions start to become translucent... I searched my spices and decided to add some sweet paprika and some sea salt... the onions turned a pretty red-orange color as they continued to sweat... I needed something else. In the fridge I spied a package of sliced mushrooms and decided to toss them in as well. Mushrooms are hit or miss in this household. They were large enough to be picked out, if necessary. The onions and mushrooms, the sea salt and paprika ... I took a bite before adding the pasta to the mixture... the flavors blended perfectly as they danced on my tongue... the pasta went in... Something else was needed... I poked around the fridge, played a little eeny meeny miney mo with the Parmesan and the Goat cheese. I picked the Parmesan and sprinkled a generous amount on to the pasta, and mixed well... and star was born!

Ingredients
1 lb fusili
1 large vidalia or sweet onion
1 container, mushrooms (I used Baby Bella)
2 tbs butter
2 tbs, approx, olive oil
1+ tsp paprika, or to taste - I prefer more, you may prefer less
Freshly ground sea salt to taste
1/2 cup of shredded Parmesan

Cook pasta per directions on container, meanwhile in a large saute pan add the olive oil and butter over medium high heat, when the butter has melted and blended with the oil add the onions and turn flame down slightly. Add paprika and stir well. Add salt, stir well and taste. When onions begin to get translucent add the mushrooms and cook for about 5 more minutes until mushrooms get nice and soft. Add the pasta and the Parmesan, mix well and serve!


Thursday, June 14, 2012

Banana Bread with a Twist ... of Cinnamon!


My ALL TIME favorite Banana Bread recipe is one I found a year or so ago. It's Emeril Lagase's. It's super banana-y and has a richness from both butter and sour cream. (I saved a few calories using light sour cream!) But trust me when I say you have not had banana bread until you have had this banana bread. The original recipe called for walnuts and I used them but I'm really not a nut person so I left them out of this batch. And I was putting all the ingredients into the mixing bowl, I realized that, gasp, I was out of vanilla. So I decided to add some cinnamon in swirl form to compensate. It was fantastic! 

Ingredients
8 tablespoons/1 stick of butter
1 cup mashed ripe bananas (about 2 large bananas)
1/2 cup sour cream (Plain or Greek yogurt works too)
2 large eggs
1/4 cinnamon sugar, you won't use all by any means
2 cups flour
3/4 cup sugar
1 teaspoon baking soda
3/4 teaspoon baking powder
Directions

Preheat the oven to 350 degrees F.
Lightly grease a loaf pan with butter or a non-stick spray
Beat the bananas, sour cream, eggs, butter and sugar in an electric mixer.
Add the flour, sugar, baking soda, baking powder and mix well. 
Pour approx 1/3 of the mixture into the loaf pan, and coat well with cinnamon sugar. Repeat in 2 more layers, adding cinnamon sugar each time.
Bake until lightly browned and bread bounces back to the touch, about 55 minutes. 
Remove from the oven and cool for 10 minutes before turning out onto wire rack to cool completely.

Wednesday, June 13, 2012

Peanut Butter and Jelly... It's not just for sandwiches anymore!


Property of Jessica Gordon Ryan and The Entertaining Kitchen

I saw this awesome recipe and then I had to totally change things because that's just what I do... and from it came another awesome recipe. These are really good... rich from all the peanut butter... and you'll need a tall glass of cold milk, unless you are like me and can't stand the stuff, in which case a nice cup of coffee or a cafe au lait or cappuccino compliments quite nicely as well!

Ingredients
2 2/3 cup oats
1 cup flour
1/2 cup sugar
1/2 cup of butter (1 stick)
1 tsp of vanilla extract
1/2 cup of lowfat milk
3/4 cup of peanut butter, your favorite brand. Here I used Skippy Chunky All Natural
1 jar strawberry jam. I used Smucker's seedless strawberry.

Directions
Preheat oven to 350
In your mixer cream together butter, sugar and vanilla
Then add oats, flour and milk. Mix on low speed initially, then you can turn up the speed.
Spread mixture onto a greased 9x13 baking dish using a rubber spatula
Empty the contents of the jam into a small saucepan, turn on low to medium and stir, until the jam starts to liquefy, then pour over the bar mixture and using the rubber spatula, spread the jam all over the top.

Place the pan into the oven for about 25 minutes.

Remove and let cool thoroughly before cutting. The jam will be too hot and the peanut butter bar will be too crumbly. These need some time to set.

Perfect for an afternoon snack or even breakfast! 

Friday, June 8, 2012

Let the children play... in the kitchen!

Food and cooking have been such an integral part of my life. I was surrounded by fabulous food and aromas in my childhood kitchen. I ate what my parents ate and was exposed to all sorts of cuisines from a young age. Nothing was held back. There was no "kid food" in my house. I ate what my parents ate. Right down to the liver and the onions. And even though I hated liver and onions I still had to try them! I encourage the same with my children. The more flavors and spices and textures the better. They may not like everything they taste but they are always willing to give new things a try. And I love this.

As I grew into my teens I began to experiment more and more in the kitchen. Food was not only meant to be eaten, but I saw it as art... It was something I could create to be visually satisfying and it was something I could create to delight my taste buds. There was nothing about cooking I didn't love. I rarely followed recipes. I'd use  cookbooks as guidelines, but then I would stray here and there... tweak here and there... add more of this, less of that, eventually creating my own dish. I was at home, happy and comfortable in the kitchen.

I cook when I am happy. I cook to entertain and to please others. Unlike many I do not cook and cannot cook when I am unhappy. And that's probably why this blog has been so badly neglected over the past year or so. Now I cook but am so busy with all the other aspects of life that I rarely have time to document... I vow to get better about this, because I do enjoy it so.

And now my children enjoy it so as well. Especially my boys.

The other day I decided to use some chicken to make sandwiches for lunch. I tossed the breasts into a pan that was coated with a little bit of olive oil and sprinkled some sea salt, paprika and garlic powder onto the breasts as they cooked away.

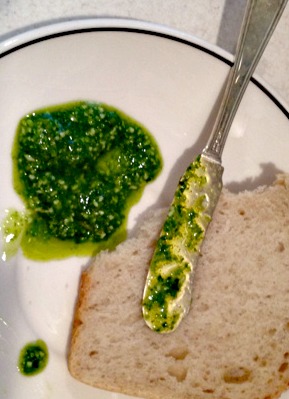
Meanwhile my boys were getting busy as well pulling from the fridge some Parmesan, lemons, garlic and basil. They were determined to make some pesto. They had no recipe. They didn't need one. They had the proper ingredients. And they added, blended, added some more, tweaked here and there, added some more, blended and and tweaked until they got their pesto just the way they wanted it!

The Entertaining Kitchen

The Entertaining Kitchen

And they came and found me with a spoonful of it and I have to say it could very well have been the best pesto I have ever had! This one was nut-free. No pine nuts - no nuts of any type. Alexander even told me that he'd added a secret ingredient. I took another taste and couldn't put my finger on it. I thought maybe he was kidding, but then he said that he had added some "Papa-rika"! And that "Papa-rika" was a perfect touch! There was indeed a lingering kick to the pesto.

My kitchen looked very much like a science laboratory when they were done. My work was cut out for me, indeed, in terms of cleaning out their mess... but I'll do it all over again. I certainly won't stop my boys from playing in the kitchen!

I'm not sure of their exact measurements or ingredients, but I can guestimate by what I tasted and what was left for me to clean up!

Please note measurements are estimated here and not at all acurate. I encourage you all to do as they did and play with your food!

2 cups packed basil - stems removed
2 lemons, juiced
3 - 4 cloves of garlic, pressed
1/2 cup of extra virgin olive oil
3/4 cup of Parmesan cheese, grated
Sea salt to taste
Paprika to taste
Place the above ingredients in a blender or mini chopper and puree until desired consistency is reached!